Aluminum Panel Installation Guide
Aluminum panels are widely used in facades, curtain wall cladding, canopies, soffits, ceilings, columns, commercial walls, decorative screens, and public building projects.
But aluminum panel projects are not only about the panel material.
A successful project also depends on shop drawings, site measurement, subframe accuracy, fixing brackets, panel numbering, joint control, edge details, coating direction, packing, and installation coordination.
For overseas contractors, distributors, architects, and project buyers, understanding aluminum panel installation basics helps reduce quotation mistakes, production errors, site rework, and final appearance problems.
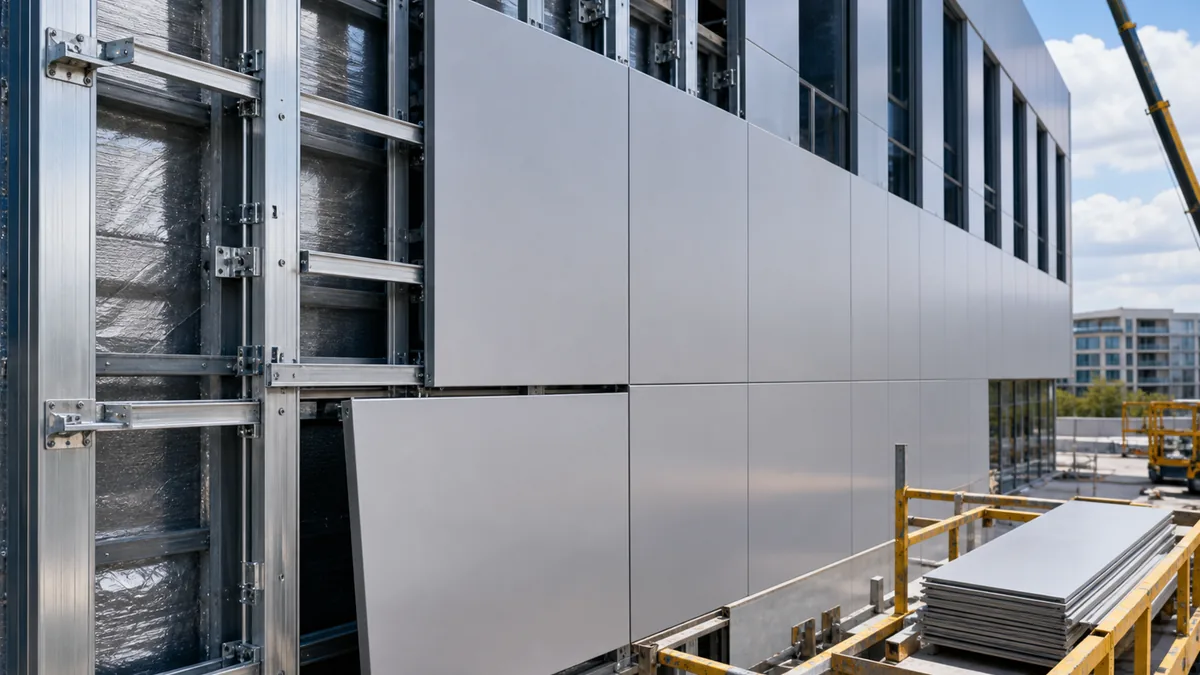
Quick Buyer Summary
| Installation Item | Why It Matters |
|---|---|
| Shop drawings | Confirm panel layout, size, numbering, edge return, and fixing method |
| Site measurement | Reduces mismatch between drawings and actual building dimensions |
| Subframe system | Controls panel alignment, flatness, and installation stability |
| Brackets and clips | Connect panels to the supporting frame |
| Edge return | Provides rigidity and fixing area for aluminum panels |
| Stiffeners | Help larger panels maintain shape and flatness |
| Joint width | Affects final facade appearance and tolerance control |
| Panel numbering | Prevents installation confusion for custom panels |
| Coating direction | Important for metallic, wood grain, and stone look finishes |
| Packing protection | Protects panels, coating, corners, and custom shapes during shipment |
Why Installation Planning Matters
Many aluminum panel problems do not come from the aluminum sheet itself.
They come from poor project coordination.
Common causes include:
- Drawings are not confirmed before production
- Site dimensions are different from original drawings
- Panel size is too large for the subframe system
- Edge return is not suitable for fixing method
- Stiffeners are missing
- Joint width is not controlled
- Panel numbering is unclear
- Coating direction is ignored
- Installation accessories are not included in quotation
- Packing does not protect panel corners and coating
For custom aluminum facade panels, installation planning should start before production.
Typical Aluminum Panel Installation System
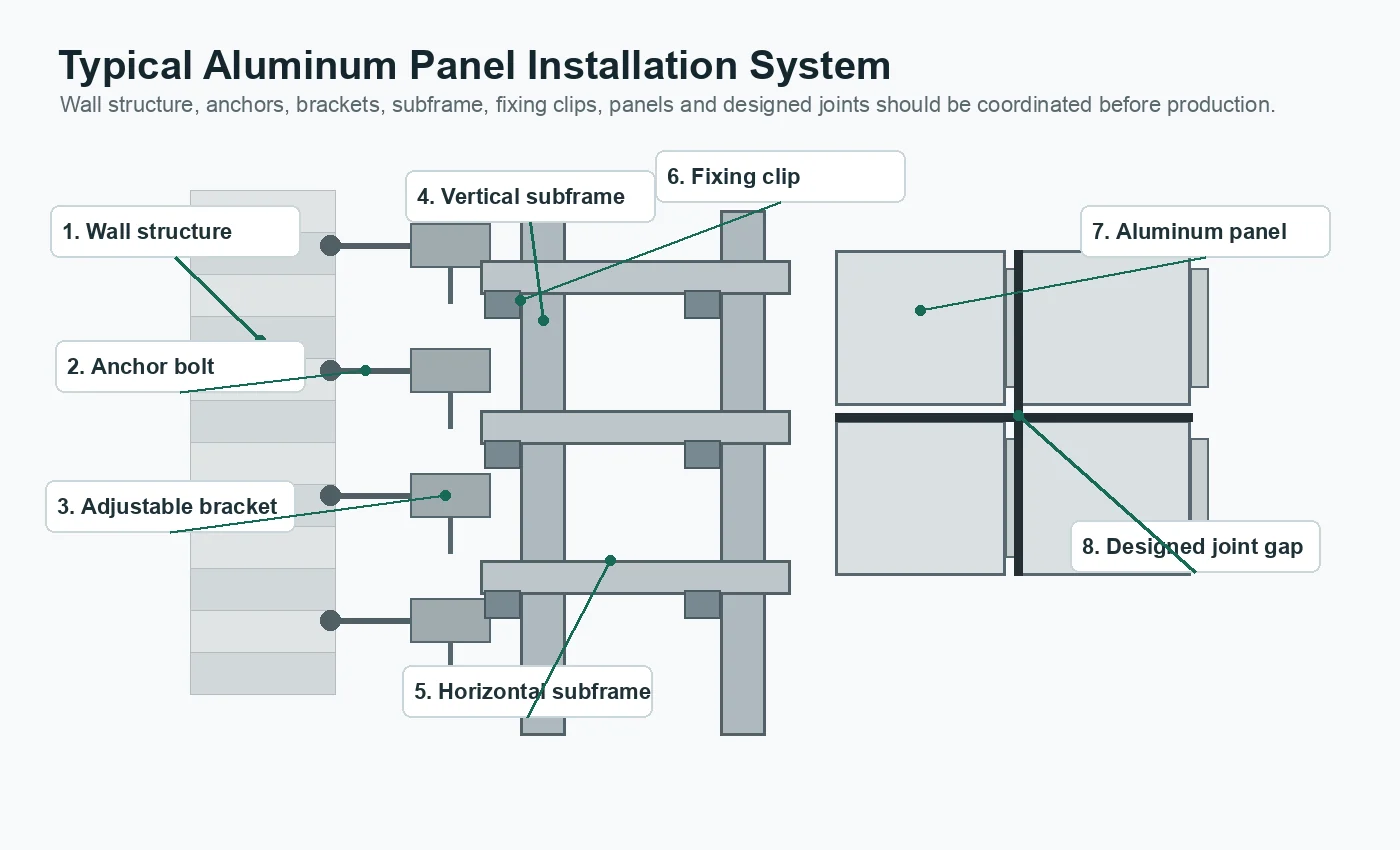
A typical aluminum panel installation system may include:
| Component | Function |
|---|---|
| Wall structure | Main building surface or structural base |
| Anchor bolt | Connects bracket to wall or structural base |
| Adjustable bracket | Helps adjust distance and alignment |
| Vertical subframe | Supports panel system vertically |
| Horizontal subframe | Supports panel layout horizontally |
| Fixing clip or bracket | Connects aluminum panel to subframe |
| Aluminum panel | Visible finished cladding panel |
| Joint gap | Allows designed appearance and installation tolerance |
The exact system depends on project design, panel type, building structure, local code, and installation contractor method.
Structural safety, wind load, fixing strength, fire performance, and local compliance must be confirmed by project engineers, drawings, supplier data, and test reports where required.
Main Aluminum Panel Applications
| Application | Installation Focus |
|---|---|
| Exterior facade panel | Subframe accuracy, wind load, joint width, coating system |
| Curtain wall cladding | Shop drawings, fixing method, panel numbering |
| Aluminum soffit panel | Drainage, ventilation, edge closing, coating system |
| Aluminum ceiling panel | Suspension system, access panels, lighting coordination |
| Perforated screen panel | Open area, pattern direction, stiffener, subframe |
| Curved aluminum panel | Radius, panel segmentation, numbered installation |
| Column cladding | Radius, panel joint, corner closing, site measurement |
| Honeycomb panel wall | Large panel flatness, edge frame, fixing system |
The installation system should match the product type and project location.
Shop Drawings and Site Measurement
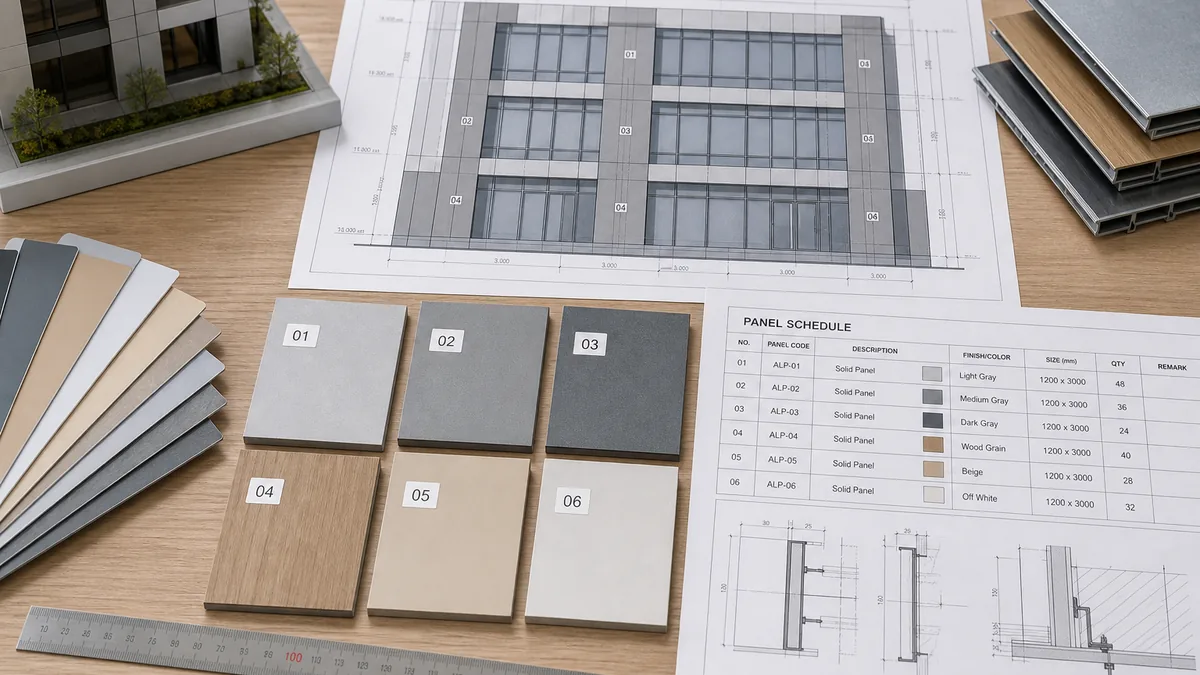
Shop drawings are one of the most important parts of aluminum panel projects.
Useful drawings include:
- Elevation layout
- Panel schedule
- Section detail
- Edge return detail
- Subframe detail
- Corner detail
- Joint detail
- Ceiling or soffit layout
- Panel numbering drawing
- Installation sequence drawing
Before mass production, site measurement is recommended for custom facade, soffit, ceiling, column, and curved panel projects.
Site measurement helps confirm:
- Actual wall dimensions
- Opening positions
- Column radius
- Beam and slab position
- Uneven building surface
- Installation tolerance
- Final panel segmentation
If panels are produced only according to old drawings without checking site conditions, installation mismatch may happen.
Panel Numbering System
For custom aluminum panel projects, each panel may have a different size or shape.
Panel numbering helps match each panel to the correct position.
A good numbering system should include:
- Panel number
- Elevation area
- Floor or zone
- Panel size
- Installation direction
- Color or finish code
- Packing position
- Drawing reference
Panel numbering is especially important for:
- Curved aluminum panels
- Hyperbolic panels
- Perforated or carved panels
- Wood grain or stone look panels
- Large facade projects
- Ceiling layout projects
- Column cladding projects
Without clear numbering, installation teams may waste time searching for panels or install panels in the wrong position.
Fixing Brackets, Edge Return and Stiffeners
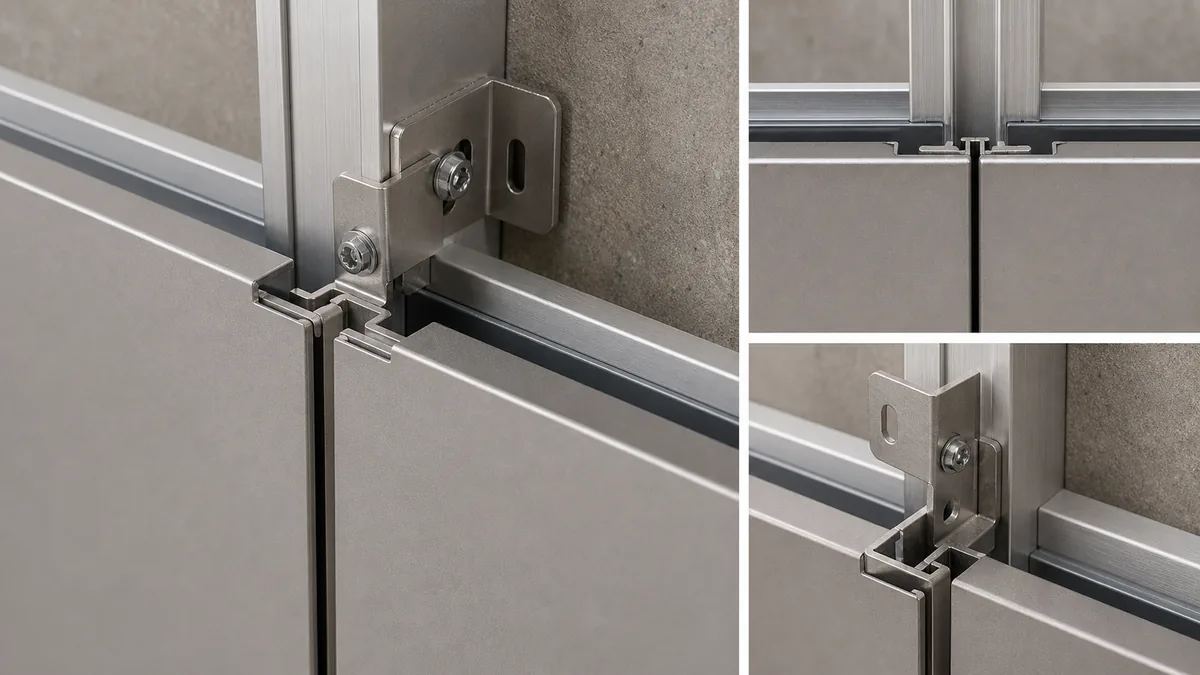
1. Fixing Brackets
Fixing brackets connect aluminum panels to the subframe.
They affect:
- Installation stability
- Adjustment ability
- Panel alignment
- Joint consistency
- Installation speed
The bracket type should match panel edge detail and subframe design.
2. Edge Return
Edge return means the folded edge around the aluminum panel.
It affects:
- Panel rigidity
- Fixing position
- Joint appearance
- Panel depth
- Packing size
- Fabrication cost
Edge return should be confirmed before production because it directly affects installation method.
For fabrication details, buyers can also review the aluminum panel edge folding guide.
3. Stiffeners
Stiffeners or reinforcement ribs may be required for larger panels.
They help improve:
- Panel flatness
- Shape stability
- Resistance to deformation
- Final visual quality
When comparing quotations, buyers should check whether stiffeners are included.
A quotation with stiffeners and a quotation without stiffeners are not the same.
Joint and Edge Details
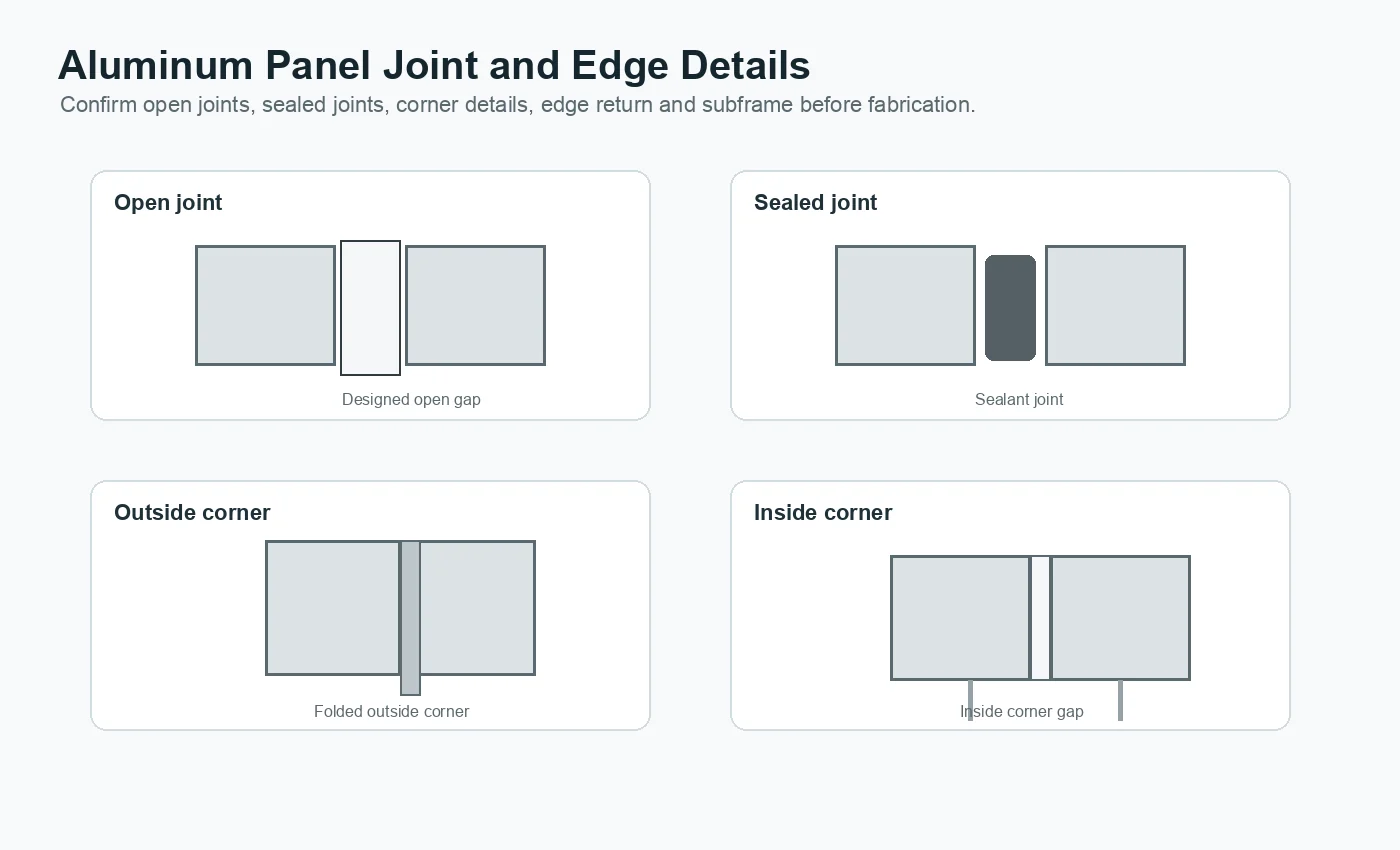
Joint design affects the final appearance of aluminum panel projects.
| Joint Type | Typical Use | Buyer Notes |
|---|---|---|
| Open joint | Modern facade and screen systems | Requires clean subframe and waterproof design behind if needed |
| Sealed joint | Exterior facade areas needing weather sealing | Sealant type and joint width should be confirmed |
| Shadow gap | Decorative wall and ceiling applications | Requires accurate layout |
| Narrow joint | Premium interior panels | Higher installation tolerance requirement |
| Wide joint | Facade design or large panel layout | Visual rhythm should match drawings |
Corner details should also be confirmed.
Common edge areas include:
- Outside corner
- Inside corner
- Window edge
- Door edge
- Ceiling edge
- Soffit edge
- Column edge
- Floor transition
- Parapet and roof edge
Many project problems happen at corners and edges, not in the middle of the panel.
Installation Workflow
A practical aluminum panel installation workflow may include:
- Confirm project drawings
- Confirm panel layout and shop drawings
- Check site measurement
- Confirm subframe design
- Confirm panel size, edge return, and fixing method
- Produce and number panels
- Pack panels according to installation zones
- Install anchors and brackets
- Install vertical and horizontal subframe
- Check alignment and level
- Install aluminum panels according to numbering
- Adjust joint width
- Complete edge trim and sealant if required
- Clean surface and inspect coating
- Remove protective film at correct time
The exact sequence depends on project type and local installation practice.
Facade Panel Installation Key Points
For exterior facades, buyers and contractors should pay attention to:
- Building structure condition
- Anchor position
- Bracket spacing
- Subframe verticality and flatness
- Panel edge return
- Stiffener position
- Joint width
- Drainage and ventilation
- Sealant or open joint design
- Coating direction
- Site protection after installation
Exterior facades usually require more careful engineering coordination than interior wall panels.
Ceiling and Soffit Installation Key Points
Aluminum ceiling and soffit panels have different installation requirements.
For indoor aluminum ceilings, confirm:
- Suspension system
- Module size
- Access panel position
- Lighting opening
- Air outlet coordination
- Ceiling height
- Edge trim
For exterior soffit panels, confirm:
- Metal subframe
- Coating system
- Drainage
- Ventilation
- Wind exposure
- Edge closing
- Maintenance access
- Water path around canopy or overhang
Soffit installation is closer to facade work than normal indoor ceiling work.
Curved and Special-Shaped Panel Installation
Curved and hyperbolic aluminum panels require extra coordination.
Buyers should confirm:
- Radius
- 3D model if required
- Panel segmentation
- Forming method
- Panel numbering
- Subframe geometry
- Mock-up or trial checking if required
- Packing for curved shapes
For hyperbolic aluminum panels, each panel may have a unique shape and installation position.
Wrong numbering or poor subframe accuracy can cause major installation problems.
Common Installation Risks
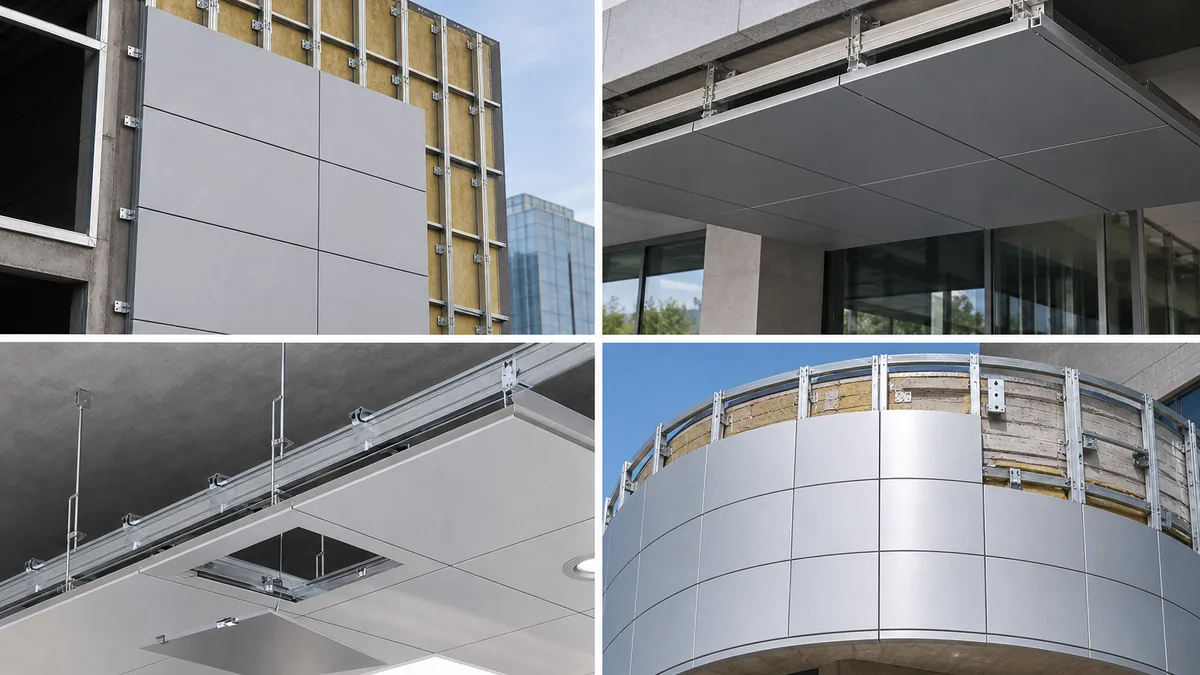
Many aluminum panel installation problems can be avoided with better preparation.
Common risks include:
- Production starts before shop drawings are confirmed
- Site measurement is skipped
- Subframe is not accurate
- Panel numbers are missing or unclear
- Edge return does not match fixing method
- Stiffeners are not included
- Panel joints are not consistent
- Coating direction is inconsistent
- Wood grain direction is installed incorrectly
- Curved panels are installed in wrong sequence
- Sealant joint is poorly controlled
- Accessories are missing from quotation
- Protective film is removed too early or too late
- Panels are scratched during handling
For export projects, drawings, numbering, packing, and installation communication are especially important.
Aluminum Panel Installation vs Product Supply
Some suppliers only provide aluminum panels.
Some suppliers provide panels plus accessories.
Some projects require local installation contractors.
Before order, buyers should clarify:
| Scope | What It Includes |
|---|---|
| Panel supply only | Aluminum panels fabricated and packed according to drawings |
| Panel + accessories | Panels, brackets, clips, screws, trims, and selected accessories |
| Full system supply | Panels, subframe, accessories, ceiling system or facade fixing system |
| Installation guidance | Drawings, numbering, installation notes, and remote support |
| Local installation | Usually handled by local contractor depending on project country |
Buyers should not assume all accessories are included unless the quotation clearly states it.
What Buyers Should Confirm Before Quotation
Before requesting quotation, please prepare the following information:
- Project type: facade, ceiling, soffit, canopy, screen, column, etc.
- Product type: aluminum solid panel, honeycomb panel, perforated panel, curved panel, ceiling panel, etc.
- Indoor or outdoor use
- Total area in square meters
- Drawings or reference images
- Panel size or layout
- Aluminum thickness or panel thickness
- Edge return size
- Stiffener requirement
- Surface coating and color
- Joint type: open joint, sealed joint, shadow gap, etc.
- Installation system: brackets, clips, subframe, ceiling suspension, etc.
- Accessories required or not
- Packing requirement
- Destination country and port
- Sample or mock-up requirement
Clear installation information helps suppliers quote more accurately and reduce project mistakes.
FAQ
How are aluminum facade panels installed?
Aluminum facade panels are usually installed on a metal subframe with brackets, clips, folded edges, designed joint gaps, and panel numbering according to project drawings.
Do aluminum panels need a subframe?
Most facade, ceiling, soffit, and screen aluminum panel systems require a subframe or suspension system. The exact system depends on project design and local installation practice.
What is edge return in aluminum panels?
Edge return is the folded edge around the aluminum panel. It helps improve rigidity and provides a fixing area for installation.
Why is panel numbering important?
Panel numbering helps match each custom aluminum panel to its correct location, especially for facades, curved panels, perforated panels, and wood grain or stone look panels.
Do I need shop drawings before production?
Yes. For custom aluminum panel projects, shop drawings are strongly recommended before production.
What causes uneven aluminum panel joints?
Common causes include inaccurate subframe, inconsistent panel size, wrong installation sequence, poor site measurement, or unclear joint design.
Can suppliers provide installation accessories?
Some suppliers can provide brackets, clips, screws, trims, ceiling carriers, or other accessories. Buyers should confirm whether accessories are included in quotation.
What information is needed for quotation?
Buyers should provide project type, drawings, panel size, thickness, edge return, coating, installation method, accessory requirement, packing requirement, and destination port.
For custom facade or ceiling orders, panel numbering and packing sequence can help the installation team find the correct panels on site.
Request Aluminum Panel Quotation
Send your drawings, panel size, thickness, surface finish, quantity and destination port. We can help check suitable aluminum panel options, fabrication details, packing method and factory quotation.
For overseas buyers, early communication should also cover the import process and installation coordination, especially panel numbering, packing and site handling.